Quick-setup pad
- The Quick-setup pad is NOT a full set-up tool and does not substitute the complete set-up process done with our software tools.
- Your hardware variant and installed firmware application must support the Quick-setup pad.
The built-in motor identification procedure will push up to half of the controller's rated current through the motor coils (in steady state)! If your motor is too small (not matched with the controller size), it may not thremally withstand this current! In such a case, please decrease the iref value with our software tools.
Introduction
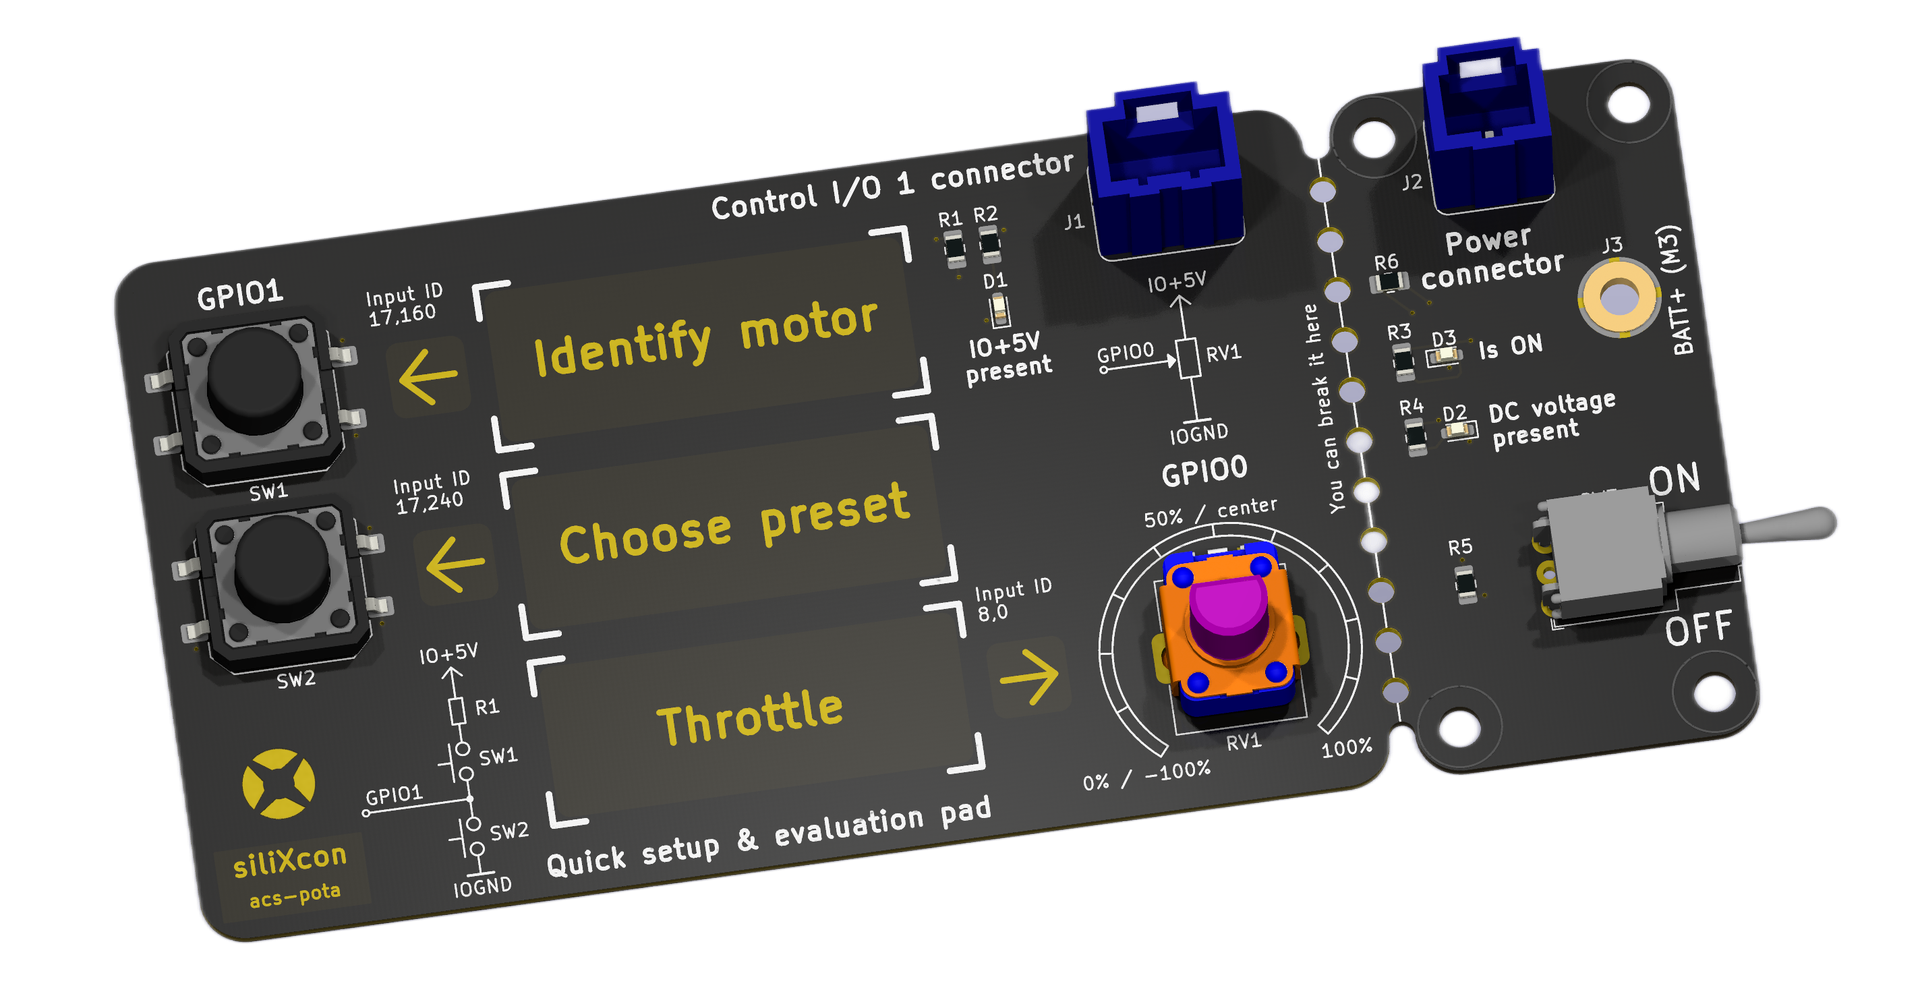
SiliXcon platform is versatile and offers plenty of functions. The aim of the Quick-setup pad (supplied with your sample) is to make the initial set-up for basic motor drive and first-run process as simple as possible. You do not need to install any software, understand the platform or read exhaustive manuals for first-run configuration. With our Quick-setup pad and FALCON, you can quickly:
- restore factory defaults,
- identify the motor,
- choose one of the functions,
- set the reference current,
- try the drive control with analog potentiometer.
If you do not have / wish to use the Quick-setup pad, you will need our software tools. Then, you can:
- use our on-line application wizard, which will guide you step-by-step, or
- perform the motor identification according to this guide,
- test and evaluate the drive according to this guide.
Step-by-step guide
1. Prepare the hardware
-
Connect the power lines from controller to the battery and to the motor. Ensure to match the motor power with controller specifications and check the DC voltage stability and ability to deliver the expected current. Do not use a power supply. Mount the motor safely on a bench and make all necessary precautions to prevent any injuries. Optionally, connect also the hall sensors from the motor to the controller according to the specifications, if the hall input is available in your hardware variant.
-
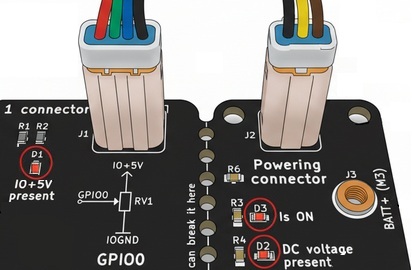
Plug the two JST connectors labeled "control I/O 1" and "powering" from your controller to the Quick-setup pad. (If you can not find the corresponding connectors on the controller, you may not have the right hardware variant.)

-
You should be able to see the "DC voltage present" LED to be active. If not, please check if the battery is connected. Optionally, provide the battery voltage through the BATT+ input to make the LED active.
-
Turn on the rocker switch. You should be able to see the "Is ON" LED to be active, as well as "IO+5V present" LED on the control side. The controller should indicate no error with it's on-board LED.
Congratulations! The setup is now fully ready.
2. Do the motor identification

Make sure that the motor can move freely. Then press and hold the A/Identify motor button for 5 seconds (until the procedure starts). The press-and-hold will be acoustically signalized, unless this is the first time you're doing the identification.
- The built-in indentification presumes a simple PMSM motor (no flux weakening / reluctance control). For full-featured characterization and tuning, please download and use our software tools.
- The identification will attempt to learn the hall sensors (if provided). Control will fall back into sensorless mode when halls are not usable.
- For each new motor type / motor-sensor pair you need to do identification again.
- The motor will spin during the procedures! Please do all precautions to prevent any injuries!
- Never run these procedures when the motor is mechanically connected to a ground-standing wheel!
After completion, you should hear the confirmation melody. If you could not start the sequence or the melody was not played, ensure that the controller is properly powered, doesn't indicate error and the USB cable is unplugged. Optionally power cycle the controller with the rocker switch and repeat this step.
3. Choose presets with acoustic menu

To enter the acoustic menu, press and hold the B/Choose preset button for 5 seconds. The press-and-hold will be acoustically signalized. Here is the menu diagram:
While you are in the menu, you can do two things:
-
to change the reference current, repeatedly press A/Identify motor button to cycle between offered preset levels. There are 8 levels to choose from and each one is acoustically signalized with each button press:
-
to change the function, repeatedly press B/Choose preset button to cycle between offered function presets. FALCON offers the following function presets:
Melody Function preset description Uni-directional prop control with freewheel. The controller works just as a "standard" BLDC ESC with "PWM" mapping and the usual freewheeling (no braking). Common RC car with RC braking system. Negative input will result into torque brake. To reverse, first release the input (enter the center deadzone). Setting input to negative value then will start reversing. Bidirectional, symmetrical control, mapped to current (torque). You may expect this behavior from a standard FOC motor control system. Bidirectional, symmetrical control, mapped to voltage. Useful to demonstrate the dynamic performance of the drive. Good choice for acrobatic performance. Bidirectional, symmetrical control, mapped to speed reference (governor). Stabilize the speed in a closed loop. infoThe FALCON offers far richer functionality and plenty of fine-tuning options besides those fixed presets. For full-fledged setup, please read the features and use our our software tools.
The acoustic menu will exit after 5 seconds after last button press and you will hear the confirmation melody. It signifies that your choices were saved and will persist after reset:
The acoustic menu will exit after 5 seconds if you won't select anything, with this melody:
4. Try out the throttle potentiometer

Evaluate the function of the drive:
- Please note that after each function change, the potentiometer is disarmed and you need to first find the neutral position (which is different for uni/bi-directional functions).
- You can use either servo PWM input or analog input. The controller uses whichever signal is valid.
The motor doesn't produce any sound and you can not enter the acoustic menu, unless the identification was performed first.
Restore factory settings
If you want to discard everything and start over, press and hold the A/Identify motor together with B/Choose preset button for 5 seconds. The press-and-hold will be acoustically signalized. This will restore the factory settings of the controller and you will hear the factory reset melody (unless controller is already in factory settings and no motor identification was performed):