term basics II : Moving around
this tutorial demonstrates a few examples of how to work with the device through CLI using the term tool. Namely, navigating through the entries, viewing and setting some variable's values and finally, saving the parameters to the onboard memory.
- Let's presume that a successful comlink with the device was already established (the device is connected, connection options were set, the driver was installed, etc.)
- Let's presume that you have successfully logged in.
- The major part of this tutorial is dedicated to explaining the device's CLI environment (rather than the term tool itself).
For more information about the term tool, check the term manual page.
Commands
A command can be executed by typing its name and pressing enter. For the scope of this manual, we will only demonstrate a typical work-flow using a few commands, namely:
helplist commandsstlist state variablesprlist parameterssetset the value of a variablelslist the directory's contentcdchange the working directorysavesave parameters to the onboard memory
As a first step, let's see a list of recognized commands. Commands are usually located in the /commands directory. For now, let's keep it simple and just use help:
Each input line, ending with the <CR> character, is divided into space-separated tokens. The first token is treated as the command name and the remaining tokens are treated as the command arguments. For detailed information about all the YOS commands, check the relevant documentation.
Variables
We may be interested to see some numbers - what's happening inside the device. There are several types of variables for us to know:
- parameters can be changed by the user but not by the device
- state variables can be changed by the device but not by the user
- permanent variables keep their values even without power
- dynamic variables can be created or deleted in run-time
Reading a value
Let's list our state variables using st now:
Okay, we got 5 variables with various types, and all of their values are zero. Let's list our parameters with pr now:

This is slightly more interesting. We got 9 parameters with various types and values. But we also got more description about them. Their default values are printed in the semicolons (). Some of them also have units in [] as well as textual descriptions and presets.
Note that st, pr, and other listing commands accept many additional options, allowing e.g. periodic listing, filtering, etc.
Setting a value
Let's try to set a parameter's value with set :
Good, no error is reported. That means our values were accepted. Let's list the parameters again, to verify the setting. This time, let's use the pr with -d option, to see only parameters which have been altered from their defaults. In the picture below, we see that our two parameters are the only altered ones.
YOS system maps variables as files. The file's content is the raw variable's value. Each variable also has an adjacent, non-volatile metadata object, which describes the variable's type, default value, etc.
Virtual file system
Up to now, we have only operated on the topmost level. For a deeper dive, let's introduce the hierarchical structure. The device contains a tree of managed items (such as parameters, state variables, permanent variables, dynamic variables, commands and so on). These are arranged in the form of a virtual file system.
As an example, let's start with printing the content of a directory. To do that, let's use the ls :
We may be interested in printing the entire tree recursively. For that, we must add the -r (recursive) and -l (long) options:
For quick navigation, you may use some keyboard tricks:
tabpress multiple times for simple auto-completion variants of the actual tokenup-arrowto recall the previous command
Working directory
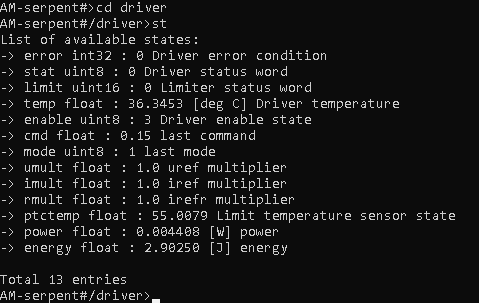
As usual, a CLI file-system navigation uses the working directory. The commands are searching for entries to work with in there. In YOS, the working directory's path is printed at a newline as part of the prompt. The default working directory (after first login) is set to the root of the device. Let's change our working directory to /driver and list state variables in there:

Now, all your following commands will work within the /driver folder, unless you specify a different path as their argument. You may specify a the virtual dotdot .. entry to navigate to the previous folder. Let's go one level back:
Usually, the directory structure matches the firmware architecture. The user-level application tends to reflect the topmost layers, whereas the deeper folders are related to submodules and encapsulated functionalities.
Path
A lot of commands accept a path as their non-option arguments. The slash / character is interpreted as a separator between the files and/or folders. Also, the slash / at the beginning specifies an absolute path. Otherwise, the path is treated as relative to the current working directory. Let's try to feed some paths to the st command:
Note that in this example, the first two arguments are the relative paths to in and out state variables, residing in the /asc0 directory. The other argument is an absolute path to a folder, therefore all state variables in that folder are listed. Now, let's go back and use set command with a path to change some parameter value:
Saving parameters
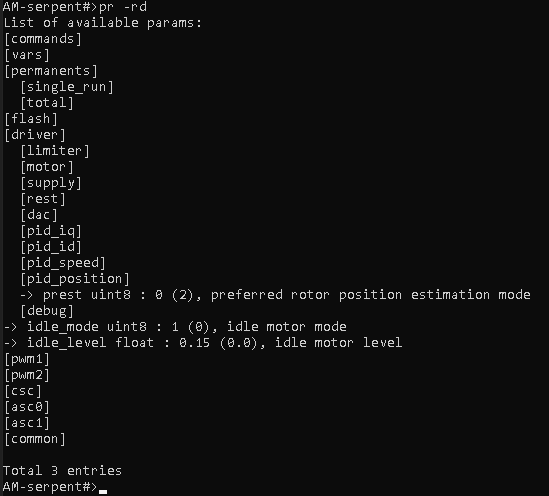
We made adjustments to some of the deeper parameter values. To check the alterations, let's use the pr with -d option again. This time, let's add -r option to check recursively. Since we will run the command from the root directory, the entire tree will be traversed and we will see a list of parameter changes in the whole device:

We see that only those three parameters we touched have an altered value. Let's consider it desirable and let's learn how to save these changes to the onboard memory. We can simply use the save command without any options. The command will prompt for verification. After the saving is complete, a confirmation is given. The changes are now stored permanently.
You may use the hash number to verify the identical configuration across devices with the same firmware.